
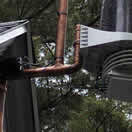
Anemometer is about 42" from the upside-down T adapter.
Design minimizes heat from the roof and exposes to more wind currents, helping the passive radiation shield.
Design also makes servicing unit easy without having to remove the whole mounting. The ISS post enables one to simply loosen the u-bolt and slide it over the small post- without having to unhook the anemometer.
The mounting must be plumb in all directions and care should be given to the installation process to insure the instruments are plumb and balanced.
Parts Needed
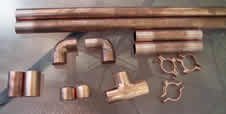
2" copper pipe; two sleeves are shown far lower left, then pipe caps, T adapter, mounting clips. Sections of cut pipe are also shown.
2 short pipe segments, 1 medium (for mounting downpipe) and 1 long cut copper pipe (Anemometer post).
The two sleeves are soldered near the top of the anemometer post, with a small gap in between each for the u-bolt, to prevent slippage of anemometer assembly.
All joints sanded, fluxed and sweat-fitted together, with careful attention to make sure the pipe used for mounting to house/post, the anemometer post, and the ISS mounting post are all aligned on one plane, not crooked/twisted. It helps to place the pipes on a flat surface. Install so that it is plumb.
